


.avif)
.svg)
.svg)


Get Business Email
No domain name required
Send invoices with a professional email
Get one with Neo Mail

As a freelancer, you completed and delivered a project to your client successfully. But now comes the critical part- asking for payments.
For most freelancers (especially those who are new to freelancing), the process of creating an invoice can be confusing. What information should you include? How to make it look professional? And how should you send it? All these questions are quite common when you are figuring out how to write an invoice for freelance work.
An invoice is more than just a request for payment: it's a professional document that protects you from a legal perspective, helps you track your income, and makes sure you get paid on time. Thus, learning how to invoice as a freelancer is a basic skill you must know as a freelancer or an independent worker.
By having an idea of how to make an invoice for freelancers correctly, you can establish clear payment terms, prevent delays in payment, confusion with clients, and put up a more professional image for your business.
Summary
For freelancers, an invoice is a gateway to a paycheck. Thus, creating correct and professional invoices is essential to ensure they receive the true and correct payment for the products or services they provide.
When creating an invoice, a freelancer must ensure to:
- Add their business and client details (like name, contact, and website information).
- Mention the project names or all the services provided with their amount (according to the rate of charge).
- Specify the invoice number. total amount, due date, taxes, mode of payment, and terms and conditions (such as related to late payment) clearly.
- Attach the invoice in a professional email template or send the invoice using the correct tool.
Freelancers may need to create multiple invoices for different projects and clients. Manual invoice creation can be quite challenging; it is always advisable to use smart invoice builders that can provide use ready-to-use templates for invoice creation.
Why Proper Invoicing is Important as a Freelancer?
Think about the last time you bought something at a store. You got a receipt, right? That receipt is the proof of what you have purchased and how much you've paid. An invoice works the same way for freelancers: it's official proof that you did the work, and your client owes you money.
Here's why it's so important to know how to write an invoice for freelance work properly:
- Get paid faster: Clear and professional invoices can help your clients to process payments quickly without confusion or questions.
- Legal protection: A proper invoice is a legal document to prove that you did work and owe money. This is to protect you in case there's ever a dispute.
- Tax records: You need invoices to keep track of your income when it is time to file taxes. Without proper records, you may miss deductions or may have issues with the tax authorities.
- Professional image: Well-designed invoices sent via email or other tools make you look organized and serious about your business. Clients trust freelancers who take care of their billing professionally.
- Track your business: Invoices help you see how much money you're making, who your clients are that are paying you on time, and where your income is coming in from.
- Avoid confusion: A detailed invoice helps avoid confusion regarding what work was done, the cost of the work, and when they should pay for the work.
Useful tip: Many freelancers simply suffer losses in payments, because they forget to invoice their customers or send an invoice too late. Set a reminder to send your invoice within 24 hours of work completion time. The speed with which you invoice, the faster you get paid.
What to Include in Your Freelance Invoice?
Creating a freelance invoice is not just a matter of listing a price and asking to be paid for it. A clear and complete invoice shows professionalism, avoids confusion, and gets you paid faster. When your invoice has all the right information, then clients don't have to email you with questions regarding any incomplete information, thus accelerating your payment process.
Below are the important elements that every freelance invoice should include:
1. Your Business Information
Start your invoice with your information. This lets the client know exactly who the invoice is from and how to contact you when required. Include your full name or registered business name, your address (if applicable), email address, and phone number. If you have a professional website or logo (if you do not have one, you can quickly create one using free AI logo makers available online), you can add that as well to make the invoice look more professional.
If you are registered for taxes, provide your tax identification number or business registration number. This is particularly important for bigger companies that need proper documentation for accounting purposes. Keeping this section clean and visible at the top of the invoice helps to build credibility and trust.
2. Client's Information
Just like your details, your client's information should also be clearly listed as well. Be sure to include the client's full name, company name (if they have one), business address, and contact email. This leaves no doubt as to who the invoice is intended for, and there is no ambiguity about whether the client is working on multiple projects or with multiple vendors.
It is important to add the correct billing contact. In larger companies, the person you work with is not necessarily the person who handles payments. Make sure the invoice is addressed to the correct department/person in order to prevent delays.
3. Invoice Number and Dates
Every invoice should have a unique invoice number. This helps you and your client easily keep track of payments. It also helps you maintain your financial records for accounting and tax filing. You can use a simple number system like INV-001, INV-002, etc.
Along with the number of the invoice, state the date of the invoice and the date for the payment. The invoice date indicates when the bill was issued, and the due date indicates clearly to the client when they are due to pay. Without a due date, clients may postpone payment simply because there was no timeline specified. Clear dates promote clarity and accountability.
4. Describe your Services
It is one of the most important parts of your invoice. Make sure that you mention all the names and details of the services you have provided clearly.
For example, instead of phrasing generic project names like ‘Freelance projects’, mention the name of each project separately, such as ‘freelance blog writing (3000 words/ blog).
If you have offered several services for a single project, breakdown the services and clearly mention each one of them with the project name.
5. Hourly Service Rates, Quantity of Work, and the Total Amount
Once you have described your services, you now need to mention the amount based on the hourly rate per project and the number of hours you have worked oneach task. Calculate the total based on the number of services and the per-hour rate, and clearly specify the total due amount.
6. Payment Terms and Due Date
This section is used to describe when and how you expect to be paid. Be clear and direct. For instance, you can write, "Payment due within 15 days of invoice date" or "Payment due upon receipt."
If you charge late fees, make note of them in this section in a polite manner. For example, "Late payments will be charged a 5% fee after 7 days." Stating this in advance encourages clients to pay on time and shows that you take your business seriously. Clear payment terms can reduce misunderstandings and protect your cash flow.
7. Methods of Payment and Instructions
Finally, inform your client how exactly they can pay you. Include your banking information, digital payment link, or platform information. If you accept more than one method of payment, list them clearly.
For bank transfers, include your account number, bank name, and possible codes. For online payments, you should include the correct email or payment link. The easier you make it for your clients to pay you, the faster you'll get your money.
If you work internationally, then mention the currency, payment mode, and ask about the details of who is paying the transaction fees.
Step-By-Step Guide to an Invoice for Freelance Work
Now that you know what should go in your invoice, here's exactly how to write an invoice for freelance work from start to finish:
Step 1: Verify that the Work is Completed (or Milestone Achieved)
Before you send an invoice, ensure that the work agreed upon has been delivered. If it's a full project, make sure to get confirmation from the client that the project is finished. If it's milestone-based, make sure that the milestone held has been approved.
This is to avoid awkward situations of a client saying, "I thought we were still revising." Effective communication prior to invoicing helps in smoother payment.
Step 2: Open Your Invoice Template or Software
Use whatever method you like: Google Docs, Excel, Canva, invoicing software, or sharing using invoice email templates. If you work on a regular basis as a freelancer, prepare one clean template and use it repeatedly. This helps save hours in the long run.
Consistency is key. When clients see the same format over and over, it creates a sense of trust and will make your business appear organized.
Step 3: Mention Business Details
Type in your business name, business email address, contact number, and Tax information (if you have). You can also add a logo to give it a professional touch.
Step 4: Include Client or Customer Information
Including your client information is essential as it helps you and the client in differentiating for whom this invoice has been generated. When writing the client information, make sure to name and contact details are spelled correctly.
Step 5: Add Invoice Date and Number
You now need to add the unique invoice number for every invoice that you have generated. This will act as an ID for each invoice that assists you in tracking payments and organizing your records.
Also, remember to add the date with each invoice. A date acts as a counter that the client needs to pay you starting with the date provided.
Step 6: Include the Details of Your Projects.
Add the project names for which you have generated the invoice. Be specific, and list the project names with their amounts based on the number of hours worked and the rate charged per hour. Ensure to bring clarity with each amount.
Step 7: Calculate and Mention the Total Due Amount.
Mention a clear breakdown of the total amount that you have calculated. This will client understand how you came up with the final total amount.
Also, make sure to place the total amount in a place where the client can easily find it. You can also include the taxes, if applicable.
Step 8:Mention the Payment Terms and Methods.
Ensure to specify the payment terms clearly. For example, you can mention, like the ‘Payments should be made in a 15-day cycle’.
Also, add the detailson how clients can make payments for your services. Include the bank account details or payment links correctly.
Step 9: Review the Invoice.
Before you send the invoice, quickly perform a scan for numbers, your information, client details, project names mentioned, total amount, etc., to validate that everything mentioned is correct.
Step 10: Send It Promptly and Professionally
Attach the invoice in a short, polite email. Keep it as simple and professional as possible. Send immediately after completion of the work or on the agreed date. Following basic email etiquette rules, such as using a clear subject line, a polite greeting, and a concise message, makes your invoice communication more effective and professional.
The quicker you send the invoice, the quicker the payment process is underway.
Common Mistakes to Avoid in the Invoicing Process
Even experienced freelancers can make mistakes when creating invoices. Avoid these to be paid faster:
Mistake 1: Descriptions being vague or incomplete
Writing "consulting work" or "design services" doesn't tell your client what they're paying for. So be specific about what you did, how long it took, or what deliverables you provided.
Solution: Always make the description as detailed as assignments, hours, or deliverables.
Mistake 2: Invoices Missing their Number
With no unique invoice number, you and your client have no way to reference unique invoices. This can create confusion when talking about payments.
Solution: Always use one unique sequential invoice number for every invoice that you send.
Mistake 3: Unclear Payment Terms
If you don't set a date when payment is due or how clients can pay, then you might get paid late, or not at all.
Solution: Always include a clear due date and specific instructions on how to pay with account information.
Mistake 4: Math Errors
Incorrect calculations make you appear unprofessional and can lead to a dispute in payments.
Solution: Double-check all calculations before sending. Better yet, use an invoice builder that can compute totals automatically.
Mistake 5: Not Tracking Up On Payment
Sometimes the clients forget to pay, or payments get lost. If you don't follow up, your payments might get delayed. You can send follow-up emails to your clients asking them politely about your payment information.
Mistake 6: Unprofessional Formats
Messy/disorganized invoices with typos or poor formatting make you look bad and may delay payment.
Solution: Approach a professional clean template. Just remember that everything should be spelled correctly and organized in a well-mannered manner.
Use a Neo Mail’s Invoice Builder to Send Professional Invoices
Creating a professional invoice is important, but how you send it is just as important. Many freelancers prepare detailed invoices but send them from generic email addresses. While that may work in the beginning, it can diminish your professional image, especially when working with agencies, corporate clients,s or international businesses.
If you want clients to treat you like a serious professional, your communication needs to reflect this.
Neo Mail provides an invoice builder as a feature in its business email plan that simplifies invoice generation process with ready-made templates. These templates are designed to reflect that your business identity. It also allows you to create, edit, and manage invoices without having to add invoice payment links.
Here’s how you can generate invoices using Neo Mail’s invoice builder:
- Visit the email composer website of Neo Mail, and click on ‘new email’. Then move to the ‘Invoices’ tab.
- You will be taken to the Invoice builder, where you will find options to create invoices and quotes. Click on the ‘invoice’ option if you want to create an invoice.
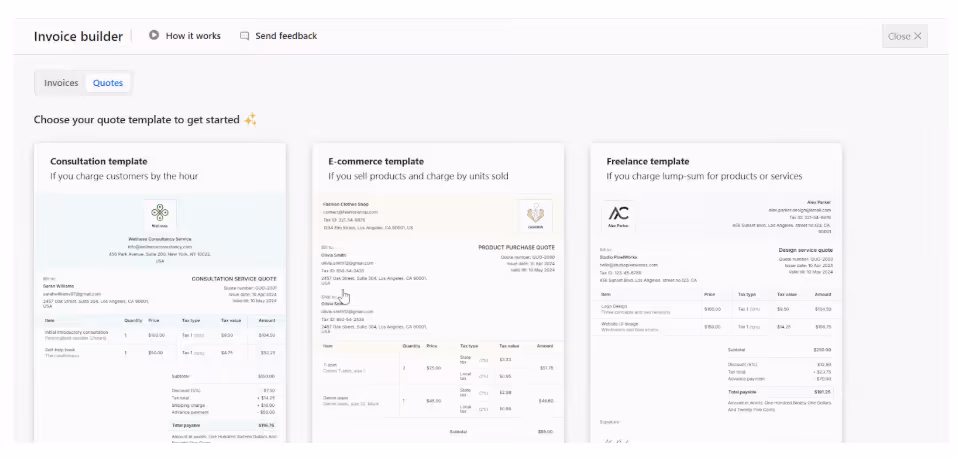
- You will find different invoice templates. Select the one that you find the best, to start creating the invoice. To start with a particular template, click on the ‘use this template’ option.
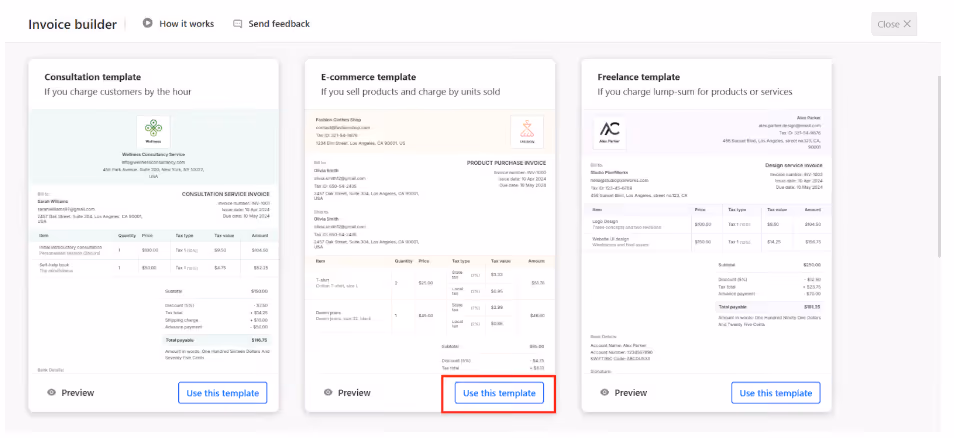
- Once the template is selected, the editor window opens. Under the editor window, you will find different invoice blocks, like business information, customer information, invoice details, add items, other information, etc.
- Once you are ready with your invoice, you can download it or also insert it into an email.
Using Neo Mail’s invoice builder can:
- Make your invoices appear more official and trustworthy.
- Decrease the probability of landing in spam.
- Reinforces your brand identity.
- It makes the chance of faster payment processing more likely.
Neo Mail can also help you to organize conversations around invoices and keep payment-related communication in one place. This becomes especially helpful as your freelance business grows and you begin to take on multiple clients at the same time.
Professional Invoicing: The Right Strategy for Freelancers
Learning how to invoice as a freelancer is one of the most important skills that you can develop in your independent career. A well-prepared invoice will protect you legally, keep your finances organized, and ensure that you get paid on time.
By providing all the necessary details, sending invoices on time, avoiding common mistakes, and maintaining professional communication, you ensure a smooth and reliable payment process, creating a solid business foundation.
FAQs
1. Do I have to create an invoice when I am just beginning as a freelancer?
Yes! Even if you're just starting, you should always use invoices for your work. Invoices are legal documentation of the fact that you performed services and are due payment. They are also helpful for you to keep track of your income for taxes. Without invoices, you have no official record of earning money, making tax problems a pain, and creating disputes over payment more difficult.
2. Should I invoice before or after doing the work?
It will depend on your agreement with the client. Many freelancers invoice immediately after they have completed work and delivered it. For larger projects, you may charge a deposit before you begin the project and then invoice for the remaining balance on completion. Some freelancers bill on project milestones. Whatever you choose, agree on the terms of payment with your client before doing any work.
3. What should I do if a client does not pay my invoice?
First, try to understand why. Is there a problem with the work? A misunderstanding concerning the pricing? Sometimes problems can be worked out through a discussion. If the client continues to refuse to pay, send a formal email letting the client know that the payment needs to be paid by a specific date.
4. Can I invoke late fees on bills that are due?
Yes, but you have to make this absolutely clear on your invoice before starting work. Common late fees are 1 - 2% per month or a flat fee (like $25) for late payment. Check your local laws; some places will have limits on late fees. Always include late payment terms in your contract or invoice payment terms section so that clients know about them in advance.
5.How long do I allow clients to pay for invoices?
One of the most common types of payment terms is Net 30, which can be defined as payment due within 30 days from the invoice date. However, you can set any terms you want: Net 15 (15 days), Net 7 (7 days), or even "Due Upon Receipt" (immediately), etc.
Shorter payment terms mean quicker payment, but some clients, especially large companies, have standardized payment processes that may need 30 or even 60 days. Talk to people about payment terms before beginning work to make sure everyone is on the same page.
Get Business Email
No domain name required
Send invoices with a professional email
Get one with Neo Mail